

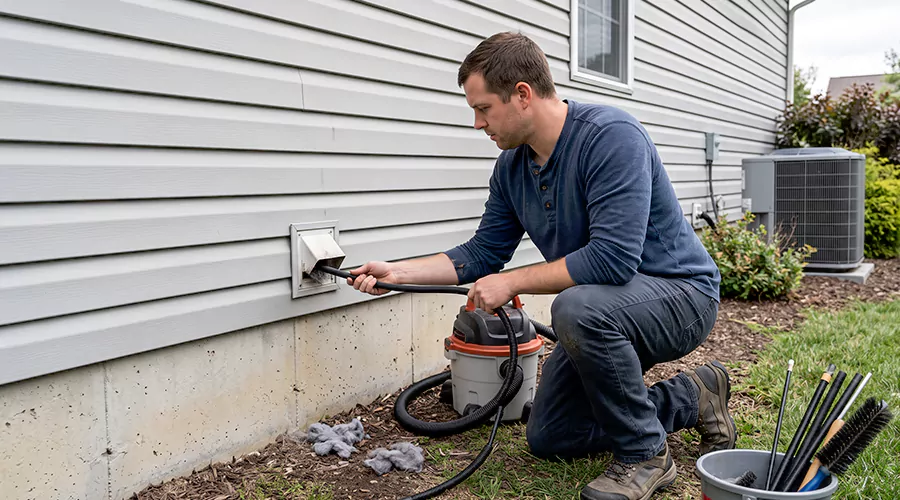
You can clean a dryer vent by disconnecting the appliance from electrical power, removing lint from accessible exhaust connections, and cleaning the vent pipe with a dryer-rated brush and vacuum. The outdoor exhaust opening should also be checked for lint and other obstructions. A typical accessible residential dryer vent may take approximately 30 to 90 minutes to clean, although long or heavily blocked systems can require more time.
Dryer vents carry warm, moisture-laden air from the appliance to the outdoors. During each drying cycle, small fibers separate from clothing and enter the airflow. The lint filter captures much of this material, but some particles continue into the exhaust duct and gradually collect along its surfaces.
Over time, accumulated lint can restrict airflow and increase drying times. A clogged vent can also contribute to overheating and fire hazards because lint is combustible. The National Fire Protection Association recommends cleaning dryer exhaust ducts approximately once a year, or sooner when the dryer shows signs of restricted airflow.
Cleaning the vent involves more than removing lint from the screen inside the dryer. The transition duct and outdoor termination also need attention. Following a careful process helps remove debris without damaging the exhaust system or creating new restrictions. For thorough cleaning of the entire exhaust system, a professional dryer vent cleaning service can help remove accumulated lint from hard-to-reach sections and restore proper airflow.
Why Is Dryer Vent Cleaning Important?
Dryer vent cleaning removes lint that collects inside the exhaust passage during normal appliance operation. Keeping the duct clear allows warm, damp air to leave the dryer more effectively. When the vent becomes restricted, moisture removal can slow and clothes may require additional drying cycles.
Lint buildup also presents a fire hazard because the material can ignite under certain conditions. The U.S. Fire Administration identifies failure to clean as a leading contributing factor in residential dryer fires. Regular maintenance reduces one avoidable source of risk, although it does not replace proper appliance installation or electrical safety.
A clear exhaust system also helps prevent unwanted moisture from collecting in the laundry area. Conventional vented dryers are designed to release moisture outdoors rather than into walls or living spaces. Proper cleaning and reconnection help maintain that intended exhaust path.
How Can You Tell if a Dryer Vent Needs Cleaning?
A dryer vent may need cleaning when drying performance declines or the outdoor exhaust becomes weak. These symptoms often develop gradually as lint accumulates along the passage. However, appliance problems can produce similar results, so the condition of the vent should be checked rather than assumed.
Clothes Take Longer to Dry
An increase in normal drying time is one of the most common signs of an obstructed dryer vent. When warm, moist air cannot leave the appliance efficiently, the laundry may remain damp after the expected cycle. The dryer may then need to operate longer to complete the load.
A restricted vent is not the only possible cause. An overloaded dryer or an unusually wet load can also extend drying time. However, recurring slow drying with ordinary loads provides a good reason to inspect the exhaust.
The Dryer Becomes Unusually Hot
A blocked exhaust can interfere with heat removal from the appliance. Some dryers may become unusually hot or shut down when internal temperature controls respond to abnormal conditions. These symptoms should not be ignored.
If the appliance produces a burning smell or shows signs of overheating, stop using it until the cause has been evaluated. Repeated operation can worsen the problem. If smoke or fire is present, evacuate and contact emergency services.
Weak Airflow at the Outdoor Vent
The exterior exhaust hood should release air when a conventional vented dryer operates. If the airflow seems weak or the flap does not open, a blockage may be present. Lint accumulation near the termination can prevent the damper from moving freely.
The condition should be checked from a safe location without placing hands into a moving mechanism. A weak exhaust may also result from a crushed transition hose or an excessively long duct run. The full exhaust path may need inspection.
Visible Lint Around the Exhaust Opening
Lint around the exterior hood suggests that particles are collecting near the outlet. Some minor deposits may appear through normal use, but thick material can obstruct the discharge path. The buildup may also interfere with the vent flap.
Cleaning only the visible lint at the outlet may not remove deposits farther inside. If the dryer continues experiencing long drying times, the complete duct needs attention. A persistent restriction should be identified before normal use continues.
Additional Warning Signs
Other signs that deserve attention include:
- Laundry remains damp after a normal cycle.
- The dryer cabinet feels unusually hot.
- Drying cycles become noticeably longer.
- Warm, humid air accumulates in the laundry room.
- The outdoor vent flap does not open during operation.
- Heavy lint deposits appear near the exterior outlet.
- The transition duct behind the dryer is crushed.
- An unusual odor appears during drying.
- The dryer stops unexpectedly because of a possible overheating condition.
- The exhaust duct has not been cleaned for an extended period.
These symptoms provide reasons for inspection, not a complete diagnosis. A problem inside the dryer may persist after the exhaust duct has been cleaned. Continued overheating or abnormal operation should be evaluated by a qualified appliance technician.
What Tools Do You Need to Clean a Dryer Vent?
A basic dryer vent cleaning project generally requires a brush designed for dryer exhaust ducts and a vacuum with suitable attachments. The tools should remove loose lint without scratching or tearing the vent material. The exact supplies depend on whether the exhaust is made from rigid metal or an approved flexible transition duct.
Gather the following equipment before starting:
- Dryer vent cleaning brush kit
- Vacuum cleaner with hose and crevice attachment
- Screwdriver or nut driver suitable for the connection clamps
- Flashlight
- Work gloves
- Cleaning cloth
- Small container for removed lint
- Replacement approved clamps if existing connections are damaged
- Dryer manufacturer's maintenance instructions
Some brush kits include flexible extension rods intended for cleaning longer ducts. These should be used only as directed because excessive force or incorrect rotation can damage the vent or cause sections to separate inside it. If the cleaning tool becomes stuck, avoid pulling or twisting aggressively.
Do not use water or liquid cleaning chemicals inside an ordinary dryer exhaust duct. The purpose is to remove dry lint and debris. Introducing moisture can leave deposits damp and may contribute to other problems.
How to Clean a Dryer Vent Step by Step?
Cleaning a dryer vent involves accessing the exhaust passage from the appliance side and checking the outdoor outlet. A simple accessible installation may be suitable for household maintenance. Long concealed ducts or roof terminations are more appropriately handled by a qualified cleaning professional.
Step 1. Turn Off and Unplug the Dryer
Switch off the dryer and allow it to cool before beginning. Disconnect the appliance from electrical power according to the manufacturer's instructions. Do not open the vent connection while the dryer is operating.
Gas dryers require additional caution because they have fuel supply lines behind the appliance. Do not disconnect a gas connection simply to gain access to the dryer vent. If moving the appliance would stretch or disturb the gas line, arrange professional service rather than proceeding.
Step 2. Clean the Lint Filter
Remove the lint screen and clear away accumulated fibers with your fingers. Examine the mesh for residue that might restrict airflow. If the manufacturer recommends washing a screen affected by fabric softener buildup, clean it accordingly and allow it to dry completely.
Use a vacuum crevice tool or a suitable lint brush to remove accessible debris from the filter housing. Avoid forcing attachments into internal appliance components. Reinstall the filter before the dryer is operated again.
Cleaning the lint filter is different from cleaning the exhaust duct. Completing this step first removes material that could otherwise enter the vent during the final test cycle.
Step 3. Locate the Dryer Exhaust Connection
Find the exhaust outlet at the back of the appliance and identify the transition duct leading toward the wall or floor connection. The transition section may be rigid or semi-rigid metal. Its exact configuration depends on the dryer and the installation.
Check whether the duct appears crushed or sharply bent. A severe restriction may require replacement rather than cleaning alone. Do not pull the appliance away from the wall until you have confirmed that electrical and gas connections can remain safe.
Step 4. Carefully Access the Transition Duct
For an electric dryer with adequate clearance, the appliance may be moved carefully to reach the exhaust connection. A second person can help prevent damage to the floor or vent. Gas appliances should not be moved in a way that strains the fuel supply.
If the duct connection is accessible and the manufacturer permits removal, loosen the appropriate clamp and detach the transition section. Avoid tearing or crushing the material during removal. Take a photograph of the original arrangement to help restore it correctly.
A damaged transition duct should not automatically be reused. If it has become severely compressed or torn, replacing it with an approved product may be necessary.
Step 5. Remove Lint From the Transition Duct
Inspect the detached transition duct for visible lint deposits. Use a dryer-rated cleaning brush to loosen material gently, then collect it with a vacuum. Work from accessible ends without forcing the tool through sharp bends.
Pay attention to the condition of the duct while cleaning. Heavily corrugated or damaged material can trap debris and may not be suitable for continued use. Replace an unapproved plastic or foil-style transition hose rather than reinstalling it.
Do not use screws that project into the exhaust passage when making connections. Protruding fasteners can collect lint and create a new restriction. Follow the appliance and duct manufacturer's attachment requirements.
Step 6. Clean the Accessible Permanent Exhaust Duct
Examine the fixed duct opening where the transition section connects to the wall or floor. Remove loose lint near the entrance using a vacuum attachment. A suitable dryer vent brush can then be used to loosen deposits farther into the passage when the duct construction and cleaning tool permit it.
Advance the brush slowly and follow the manufacturer's instructions. Do not force it around a sharp bend because rods can separate or become lodged inside the duct. If resistance suggests a major obstruction, stop and assess the situation rather than pushing harder.
A short straight metal exhaust may be easier to clean than a long route containing multiple elbows. Hidden and vertical sections may require professional equipment to reach and clean adequately. The entire passage must remain intact after cleaning.
Step 7. Inspect and Clean the Exterior Vent
Locate the outdoor exhaust hood from a safe position. The opening may be installed through an exterior wall, while some homes have a roof termination. Roof access should be left to qualified professionals because cleaning a dryer vent does not justify unsafe climbing.
With the dryer off, remove accessible lint around the outdoor hood and damper. Check whether the flap moves freely and whether nesting material or other debris obstructs the opening. Use a suitable brush or vacuum to clean reachable material without damaging the termination.
Do not install a mesh screen across the outdoor outlet. Dryer exhaust terminations need an approved damper that allows lint and moist air to leave. Screens can trap fibers and eventually obstruct the discharge.
Step 8. Reconnect the Exhaust Duct
Once the accessible passage is clean, reconnect the transition duct securely using approved fittings. The connection should remain mechanically attached and must not contain gaps. Make sure the duct follows an appropriate route without sharp bends or excessive compression.
Carefully return the appliance to its normal position without crushing the transition section. Check the clearance behind the dryer as recommended by the manufacturer. A newly cleaned vent can become restricted again immediately if the appliance is pushed against the hose.
For gas dryers, any disconnected fuel connection must be restored and checked by a qualified professional before the appliance is used. Do not attempt to test a gas line with a flame.
Step 9. Restore Power and Check Exhaust Airflow
After the vent has been fully reconnected and the appliance is safe to operate, restore power. Run an appropriate short test cycle according to the dryer manufacturer's instructions. Check the outdoor outlet from a safe location to confirm that the damper opens and exhaust air flows normally.
Listen for unusual sounds and check that the dryer is not showing overheating symptoms. A normal-looking exterior airflow test does not establish that every concealed section is free of lint. However, it helps confirm that the outlet is functioning after cleaning.
If airflow remains weak, stop using the dryer until the restriction is located. Continued operation with a significant blockage can create avoidable safety risks.
Step 10. Record the Cleaning Date
Record when the exhaust was cleaned and whether damaged materials were replaced. This information helps establish the next maintenance interval. Include any observations about unusual buildup or difficulty reaching parts of the vent.
Repeated heavy accumulation between cleanings may indicate that the duct layout or exterior termination needs attention. A maintenance record can help identify patterns rather than treating every blockage as an isolated event.
How Do You Clean Different Dryer Vent Configurations?
The cleaning method changes depending on the route of the exhaust duct. A short wall vent is generally easier to reach than a vertical passage that terminates at the roof. The accessibility of both ends determines whether household cleaning can cover the complete system.
| Dryer Vent Type | Common Cleaning Challenge | Recommended Approach |
|---|---|---|
| Short wall vent | Lint near transition and outlet | Clean accessible pipe and exterior hood |
| Long horizontal duct | Deposits along bends | Use suitable equipment and verify full passage |
| Vertical duct | Difficult access to upper sections | Professional cleaning may be appropriate |
| Roof termination | Height and fall hazards | Qualified professional service |
| Semi-rigid metal transition | Material can deform during handling | Gentle cleaning or replacement if damaged |
| Rigid smooth metal exhaust | Deposits at elbows and outlet | Brush and collect lint appropriately |
| Plastic or foil-style hose | Unsafe or unsuitable material | Replace with an approved vent product |
Some dryer exhaust ducts are installed through ceilings or walls with no intermediate access. Attempting to clean them using an unsuitable tool can leave a brush trapped inside or damage a connection. When the full length cannot be reached reliably, professional cleaning is preferable.
The correct cleaning procedure should also account for dryer model instructions. Certain installations may include approved accessories or specialized venting arrangements. Never assume that a tool suitable for one vent configuration will work safely in another.
How Often Should You Clean a Dryer Vent?
Dryer exhaust ducts should generally be cleaned approximately once a year, or sooner when drying performance declines. This recommendation applies to conventional vented dryers that exhaust air outdoors. The lint filter requires attention after every drying load.
Homes with frequent laundry use or complicated vent routes may need more frequent inspections. A long exhaust with several elbows can collect lint differently from a short, straight duct. The maintenance interval should account for actual conditions rather than rely only on a fixed calendar date.
| Component | Maintenance Frequency |
|---|---|
| Lint screen | Before or after every load |
| Filter housing | Periodically and when deposits are visible |
| Transition duct | Check regularly for crushing and lint |
| Full exhaust duct | About once a year or sooner as needed |
| Outdoor damper | Inspect periodically for free movement |
| Interior dryer components | Service according to manufacturer instructions |
A dryer that suddenly takes much longer to dry clothes should not wait until the next annual cleaning. Slow drying and weak outdoor exhaust are reasons to investigate immediately. Repeated symptoms may indicate a design or appliance problem rather than ordinary lint buildup.
What Are the Common Mistakes to Avoid During Dryer Vent Cleaning?
Dryer vent cleaning can create additional problems when the exhaust is damaged or reconnected incorrectly. A brush may be forced through a sharp bend, or the transition hose may become crushed when the appliance is returned to place. Improper attachments can also provide locations for lint to collect.
Avoid these mistakes:
- Cleaning with the appliance powered on. Disconnect electrical power before accessing the duct.
- Moving a gas dryer unsafely. Do not stretch or disconnect the gas line without appropriate professional service.
- Using a damaged cleaning brush. Detached brush sections can become trapped inside the vent.
- Forcing tools through a blockage. Excess pressure can damage the duct or push debris farther inside.
- Reusing crushed transition hoses. Severe deformation can continue restricting airflow.
- Installing plastic exhaust ducting. Use materials approved for dryer venting.
- Putting screws inside the airflow passage. Protruding fasteners may catch lint.
- Adding a screen to the outdoor outlet. Screens can become blocked by fibers.
- Venting into an attic or crawlspace. Conventional vented dryers should discharge directly outdoors.
- Operating the dryer before reconnection. The exhaust system must be properly attached and unobstructed.
Cleaning the vent does not correct every appliance problem. If the dryer continues producing a burning smell or repeatedly overheating, do not continue testing it through additional cycles. A qualified technician should identify the cause before normal operation resumes.
Can You Clean a Dryer Vent Without Moving the Dryer?
Some dryer vent cleaning tasks can be completed without moving the appliance. The lint filter housing can usually be cleaned from the front or top, and an accessible exterior exhaust hood can be checked from outside. Certain installations also provide a cleaning access point near the wall connection.
However, reaching the full transition duct may require access behind the dryer. If the appliance cannot be moved without disturbing gas or electrical connections, household cleaning should remain limited to accessible areas. A professional can handle the more involved work.
Cleaning only the outdoor hood may not remove lint trapped near the dryer or in concealed bends. The full exhaust path should be evaluated when symptoms suggest a restriction. The amount of cleaning that can be completed safely depends on the installation.
How Much Does Dryer Vent Cleaning Cost in 2026?
Professional dryer vent cleaning costs approximately $145 on average in the United States in 2026. Many standard services cost between $75 and $185, while roof or difficult-to-access vents can cost more. The final price depends on vent length, location and the amount of accumulated debris.
| Dryer Vent Cleaning Service | Estimated 2026 U.S. Cost |
|---|---|
| Standard accessible dryer vent | $75 to $185 |
| Basement or first-floor vent | $80 to $150 |
| Second-floor vent | $110 to $185 |
| Roof dryer vent | $150 to $250 |
| DIY dryer vent cleaning kit | $15 to $50 |
| Cleaning with bird nest removal | May require additional charges |
These estimates represent different services and should not be added together automatically. A contractor may include the outdoor hood and transition duct within the standard cleaning price. More extensive repairs or replacement of damaged materials are usually priced separately.
For a short and safely accessible vent, household cleaning may be practical. However, a roof termination or long vertical passage can require specialized access and equipment. The cost should be compared with the actual scope rather than assuming every dryer vent needs the same service.
When Should You Call a Professional Dryer Vent Cleaner?
Professional service is appropriate when the dryer vent is heavily obstructed or cannot be reached safely from accessible openings. Roof terminations and long concealed ducts can be difficult to clean completely. A technician can use suitable equipment to remove lint and check whether the passage is damaged.
Persistent weak airflow also deserves professional attention after accessible lint has been removed. The problem may involve a crushed duct or a blockage that ordinary cleaning tools cannot reach. The appliance itself may require inspection when symptoms remain even though the exhaust is clear.
Gas dryers deserve additional caution because moving or disconnecting the appliance can affect the fuel connection. A qualified technician should handle any work that requires disturbing the gas line. Appliance maintenance should include checking that gas connections remain sound.
How Can You Prevent Dryer Vent Clogs After Cleaning?
Preventing dryer vent clogs requires maintaining unrestricted airflow and removing lint before it accumulates heavily. Some lint will always escape the filter during normal drying. However, proper installation and regular maintenance can help prevent excessive restrictions.
Clean the Lint Filter After Every Load
Remove loose lint before or after each drying cycle. Inspect the filter periodically for residue that may reduce airflow through the mesh. Follow the appliance manufacturer's instructions when the screen needs more detailed cleaning.
Avoid Overloading the Dryer
An overloaded drum can interfere with normal tumbling and drying performance. Follow the manufacturer's recommended load capacity instead of filling the dryer tightly. Proper movement helps the appliance dry clothing without unnecessarily extending each cycle.
Keep the Transition Duct in Good Condition
Inspect the connection behind the dryer for crushing or sharp bends. Make sure the approved transition duct is not trapped against the wall. Replace damaged materials rather than relying on tape to hold a deformed hose together.
Check the Outdoor Exhaust Hood
Observe whether the damper opens during operation and closes when the dryer stops. Remove accessible lint from around the hood when the dryer is off. Keep the outlet free from snow or other obstructions without adding lint-trapping screens.
Plan Regular Vent Cleaning
Schedule a full exhaust cleaning approximately once a year. Homes with heavy laundry use or unusually long vent runs may need more frequent attention. Record each cleaning and investigate recurring slow drying rather than repeatedly operating the dryer under restricted conditions.
Conclusion
Cleaning a dryer vent involves removing lint from accessible exhaust sections and checking that the outdoor outlet remains clear. Proper cleaning can improve airflow and reduce fire hazards associated with accumulated fibers. The transition duct must be reconnected correctly without crushing it behind the appliance. Long or difficult-to-access vents may need professional service. Start by cleaning the lint filter and checking whether the outdoor exhaust flap opens normally.